
Tuesday, January 29, 2013
Obi flowers
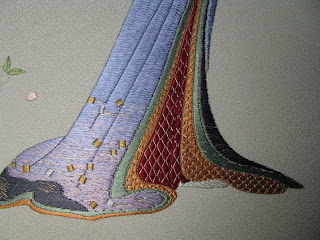
Initially I had problems with the blister flowers - the flat silk kept sliding off the knot. When I switched to my thicker glass laying tool it worked much better. The smoother and rounder glass rod allowed the silk to spread out and then be laid gently onto the knot. So the blister flowers by the left arm turned out better than those on the right, although I redid two of the first flowers on the right side. There were no problems with the superposition - although I added a number of SSHs to support the flower on the darker red fold.

Monday, January 28, 2013
Review Colors
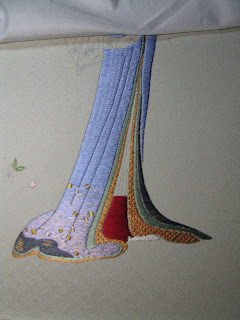
I needed to review all the colors after they are in. So took advantage of removing the tissues to take a complete picture.

Did I mention I love my Gracie? Next I will put in the outlines on the left blue kimono sleeve, and then the blister flowers on the obi.


Did I mention I love my Gracie? Next I will put in the outlines on the left blue kimono sleeve, and then the blister flowers on the obi.

Sunday, January 27, 2013

Saturday, January 26, 2013
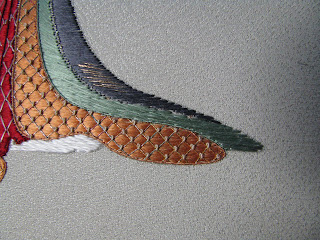
Obi SSH Done
Moving right along... SSH done for the obi and most of the kimono sleeve. I will finish the inner garments before attempting the blister flowers (superposition! Eeek!) on the obi. Hopefully will have it close to finish when Kay's class comes around in April, if I can keep at it regularly.


Friday, January 25, 2013
Obi, foreground kimono
Decided I'd better put the karayori outlines onto the kimono to stop it from getting rubbed and snagged. I manually overtwisted the karayori where it comes out of and into the fabric, to make a sharper point. There will be a lot of switching between the colors to ensure that the foreground is stitched before the background.
The obi around the waist has not been SSH'ed. I will finish the left blue kimono sleeve and get it SSH'ed next. Then I will finish up the red undergarment. Then I will continue with the obi and get it SSH'ed. I purposely made the right hand thinner.

The obi around the waist has not been SSH'ed. I will finish the left blue kimono sleeve and get it SSH'ed next. Then I will finish up the red undergarment. Then I will continue with the obi and get it SSH'ed. I purposely made the right hand thinner.

Thursday, January 24, 2013
Obi Blending
It looks nice after the blending thread is in; it evens out the wide difference in shading. Hopefully it will make the obi look very 3 dimensional when done (meaning of course that there really isn't that wide a variation in shading in both Mary Alice's and the JEC paper model).


The red thread defines the 8 mm spacing for the SSH.
Unfortunately it was impossible to see the every 3rd thread for the SSH, especially with the blending in place. So I added guide lines for the angle and I'm using the ruler to measure 2.5 mm for the SSH. I only need to do SSH for the lighter red.

I have the SSH done on the left side, and most of it on the right side. I can either do the blisters flowers next or continue on the obi around the waist.
Tuesday, January 22, 2013
Obi
Decided to call the bottom of the kimono done for now. Will need to add more round knots and a partial green outline next to the black later. The outermost outlines are supposed to be done with staggered diagonals, will be left for last.

Had to look up "random long and short stitch" for the obi. This is a realistic effect technique. I don't know if I put in sufficient differences in length between the long and the short. There's also quite a difference in shading of the two reds in the obi. Will see how the blending works out.


Had to look up "random long and short stitch" for the obi. This is a realistic effect technique. I don't know if I put in sufficient differences in length between the long and the short. There's also quite a difference in shading of the two reds in the obi. Will see how the blending works out.

Monday, January 21, 2013
Round knots revisited
I realized why the round knots on the lattice holdings are misshapened. The best instructions are in the Shuji Tamura book. In this case the thread comes out from the right of the lattice intersection, the knot is formed, and the thread goes down into the left of the intersection. Two important points:
1. Spread the loop open with the fingers of your RIGHT hand,
2. Pull the needle IN THE DIRECTION where the thread will go in when making the knot
After the knot has been formed, the "tail" with the needle is on the left side of the intersection and can then go down into the fabric without causing the knot to flop over. Another trick is to use the needle or the tekobari to keep the knot in shape while pulling through; but I haven't gotten the knack - I use my thumb to keep the knot in place while pulling through.
I took out half of the previous knots on the butterscotch undergarment and redid the knots in front - they are not perfect but turned out much neater.
Next is the outlining instructions for "TT". I used to think that TT meant "Tight twist" and I would make them by twisting the threads as usual, only much tighter. Then Mary Alice set me straight. TT is the "vein effect", used as outlining on the kimono. This consists of a soft undertwist, and hard overtwist, and sew while the thread is wet. After complaining "but that's nowhere in the book(s)" I found it in Susan Steven's book, page 252 which then refers to page 37, for Karayori - but no reference to "TT".
For my vein effect, I let the thread dry and put it on a koma so I can periodically twist it to keep it tight. I was worried that as it gradually dries while I'm working on it that it will look different as I go along, so I might as well make sure it is dried first. It makes a really good outline as the thread becomes almost completely smooth with no twist visible.
In places where there is too wide a gap between the undergarments, I did a double outline with both undergarment colors.
1. Spread the loop open with the fingers of your RIGHT hand,
2. Pull the needle IN THE DIRECTION where the thread will go in when making the knot
After the knot has been formed, the "tail" with the needle is on the left side of the intersection and can then go down into the fabric without causing the knot to flop over. Another trick is to use the needle or the tekobari to keep the knot in shape while pulling through; but I haven't gotten the knack - I use my thumb to keep the knot in place while pulling through.
I took out half of the previous knots on the butterscotch undergarment and redid the knots in front - they are not perfect but turned out much neater.

Next is the outlining instructions for "TT". I used to think that TT meant "Tight twist" and I would make them by twisting the threads as usual, only much tighter. Then Mary Alice set me straight. TT is the "vein effect", used as outlining on the kimono. This consists of a soft undertwist, and hard overtwist, and sew while the thread is wet. After complaining "but that's nowhere in the book(s)" I found it in Susan Steven's book, page 252 which then refers to page 37, for Karayori - but no reference to "TT".
For my vein effect, I let the thread dry and put it on a koma so I can periodically twist it to keep it tight. I was worried that as it gradually dries while I'm working on it that it will look different as I go along, so I might as well make sure it is dried first. It makes a really good outline as the thread becomes almost completely smooth with no twist visible.
In places where there is too wide a gap between the undergarments, I did a double outline with both undergarment colors.

Friday, January 18, 2013
Red Undergarment
After couching in the first fold, I was committed. As it didn't look right with just one fold, I had to put in the second fold on top of the tatewaku diamonds. I think it makes the undergarment look softer and more like the wood block. It's not obvious viewing it head-on, but when viewed slightly off to the side the folds show up. Don't know if it is kosher (how's that for mixed cultural metaphor) to put a fold onto the tatewaku novel effect for a JEC phase piece. This may eliminate me from considering going for Phase 10 and certification; which is not under consideration for me right now.


Wednesday, January 16, 2013
Gracie Woodblock
This is the original woodblock for Gracie. It is called The Geisha Itsutomi by Chobunsai Eishi (1756-1815)


I have not couched in the fold yet. In fact I may add in an extra fold by just couching on top of the tatewaku diamonds. I will sleep on that.

There are a lot of soft folds on the red undergarment. However with the tatewaku effect it is difficult to do a lot of them. I put in one fold by couching in a guideline and then breaking the lattice lines along the fold.

The tatewaku effect is more difficult to do than I expected. Maybe I should have used a 1F for the 2 side stitches. They are too subtle to see when done. And I forgot to check to make sure that the diamonds line up both horizontally and vertically - oh well.

I have not couched in the fold yet. In fact I may add in an extra fold by just couching on top of the tatewaku diamonds. I will sleep on that.
Monday, January 14, 2013
Kimono Undergarments
I used a very pale cream color for the knots in the lattice holding of the butterscotch undergarment, as gold knots fade too much into the foundation. Most of the round knots did not turn out with the perfect "S" shape according to Susan Stevens instructions. They are small enough that I hope they won't be obvious.
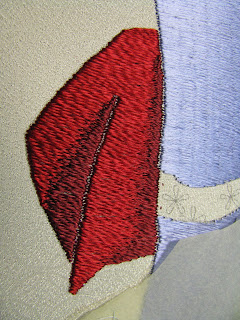
Then I started on the red underskirt. The static electricity was really bad today, even with licking the thread a lot, so didn't do much. I hope it's the winter condition and not a property of the red silk.
I am considering adding a fold on the red skirt - like in the original woodblock - to give it a little softness. That will involve "breaking" the steam rising (tatewaku) novel effect along the fold, and couching on a fold line. I am apprehensive as I haven't seen anybody else doing it.

Saturday, January 12, 2013
Lattice Holding

Wednesday, January 9, 2013
Kimono undergarment
Finished the foundation for the butterscotch inner undergarment. This will have lattice holding. I'm debating whether to use honey gold metallic or twisted silk for the lattice. I will have to try each in turn.


Tuesday, January 8, 2013
Gracie Teaching Notes
Mary Alice gave me the Gracie teaching class notes (a 47 page tome) during class. Since I already did a bit using only the French book and the paper picture model there were some "Oops, I did it wrong...Oh well... (not going to take it out now)" moments, plus some interesting cultural notes, as follows:
1. Color = rank. Black is the highest (only for the emperor) then red, then blue. ... Jewel tones are not used in Japan; they have no jewels. Blue is not used much (It caused much agonizing when I decided to use blue) Orange and gold are the usual colors.
2. This is a spring design, thus should use spring colors. Summer and autumn colors will conflict with the cherry blossoms.
3. Kimono undergarments would be brighter and more colorful to be eye-catching.
Now for the technique faux pas and tips:
4. For the kimono - there are NO blended threads; use 2 needles instead, one for each color (The two blending threads share the same hole horizontally, then the hole is covered by the holding thread - an Eureka moment for me!)
5. The stitches on the picture model are too short for the undergarment.
6. Very small one point open space between the undergarments.
7. Tapering the stitching from 1.5F to 1F as the undergarment area narrows towards the top.
8. For blending area, use thicker thread with softer twist.
9.Petal stitches should be shorter - else they will look like fish bones.
And the Oops-oops-oops - the eyes and eye brows on the design as printed(!) are too steep an angle. They should be closer to parallel to the foundation stitches. I like my Gracie's face anyway!
Today's accomplishment - the butterscotch color undergarment. I made a very small one point open space between it and the green undergarment and switched to 1F towards the top.

Monday, January 7, 2013
New Year's resolution - getting back into "serious" stitching. For the past several months I've been doing some easier needlework endeavors, mostly Christmas ornaments. A couple of examples
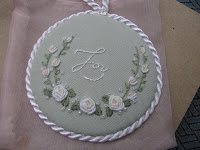


Bullion roses

Stumpwork

The purple rose is a practice piece - not very Christmas-y.
I also worked on the Polar Shadows piece (not finished), and it's not easy, which is what's driving me back to Japanese embroidery.

Before starting back on Gracie, I took a deep breath, organized the equipment, tightened the frame, took a picture, and wait till tomorrow.

Subscribe to:
Posts (Atom)