
Tuesday, April 30, 2013
Fence posts, fence
I finished the fence posts, and started on the flat gold fencing. It was horrible. It was almost impossible to see every other valley of the fabric to stitch the flat gold. It took at least 5 tries. I stopped taking it out not because it was done well, but because I got tired and it was not improving. The couching was also not good. Maybe I'll try not going for the valley and just measure the distance between the flat gold.

Monday, April 29, 2013
Lightning bugs, fence post
All 3 bugs are done except for their glow spots. I started on the katayori fence post. I don't want the posts to be too dark brown - going for the weathered look.


Saturday, April 27, 2013
Falling Stars
I decided to do the Falling Stars piece, at least until I get frustrated enough to switch to Camellia.

Detail of the (almost) finished bug. The white wings have de-cored #1 silver mixed in. I haven't decided how I want to stitch the glow spot.


Tuesday, April 23, 2013
Falling Stars, Camellia
I spent 2 days of class on Camellia, and 2 days on Falling Stars, with Kay Stanis.
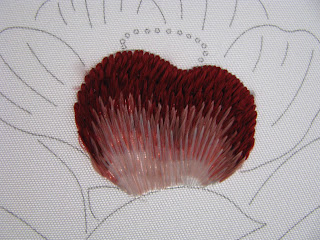
Camellia was not easy (is anything in JE ever easy?!) I had to re-do the first petal at least twice before it was somewhat acceptable. The technique is stylized long and short stitch (realistic alternate Ra), with conflicting instructions - one book says to come up and split the thread, the other says to go down and make a noticeable divot, and Susan Stevens book says either way is ok. I decide I don't want the divots, so I'll stay with coming up for the whole piece. I had to draw in the stitch lengths to get them to come out reasonably even. - And I thought I knew how to do long-and-short stitch...

Next is Falling Stars. Here's what the JEC book shows:

Kay said that flat gold is a Phase XI technique! Ouch ouch ouch! I had difficulty seeing the every other valley that the flat gold needs to sit on. The Ro fabric is nice to work with though.
I haven't decided whether I want to work exclusively on one, or the other, or alternate between the two.
Camellia was not easy (is anything in JE ever easy?!) I had to re-do the first petal at least twice before it was somewhat acceptable. The technique is stylized long and short stitch (realistic alternate Ra), with conflicting instructions - one book says to come up and split the thread, the other says to go down and make a noticeable divot, and Susan Stevens book says either way is ok. I decide I don't want the divots, so I'll stay with coming up for the whole piece. I had to draw in the stitch lengths to get them to come out reasonably even. - And I thought I knew how to do long-and-short stitch...

A close-up of the petal. Looks like I need to do some fixing on the left side. The rest of the petal is not perfect but I'll live with it.

Next is Falling Stars. Here's what the JEC book shows:

Kay said that flat gold is a Phase XI technique! Ouch ouch ouch! I had difficulty seeing the every other valley that the flat gold needs to sit on. The Ro fabric is nice to work with though.
I haven't decided whether I want to work exclusively on one, or the other, or alternate between the two.
Saturday, April 13, 2013
Partridge Pedro Finished
Instead of spangles I sewed on beads. The pencil outlines were visible, so I'm hoping the beads and signature and date will detract.

I finished the ornament - not as elaborately as the published one. I'm not sure I like the crystals at the top on the bottom of the ribbon - I will think about it.

It's time for JE class the coming week! Hooray!
If I have time before that I will be reading the book Vision and Art: the Biology of Seeing.
Friday, April 12, 2013
Pedro the Partridge
Pedro is somewhat modified from the original piece based on this photo.

Almost done. Will review Pedro tomorrow and finish up.


Almost done. Will review Pedro tomorrow and finish up.

Tuesday, April 9, 2013

Sunday, April 7, 2013
Partridge ornament

I stitched this in the order as defined by JE, ie. foreground first, then background, instead of following the order specified by the instructions. I also made the branches uneven and gnarly, and did not put as many colors in the green leaves.
Friday, April 5, 2013
Luminous effect
This shows promise. I will revisit later.

I need to embroider something fun. This is the Partridge in the Pear tree from Inspirations magazine.


I need to embroider something fun. This is the Partridge in the Pear tree from Inspirations magazine.

Thursday, April 4, 2013
Iridescence, Fail; Luminosity, Maybe
Iridescent effect did not turn out. I am putting this aside for later consideration.

Luminous effect shows promise. This is DMC cotton floss on a black background (no shiny or metallic thread was used). The picture was taken without flash. Unfortunately the photo looks a lot more luminous than the actual piece. I am freehanding the moon and its reflection.


Luminous effect shows promise. This is DMC cotton floss on a black background (no shiny or metallic thread was used). The picture was taken without flash. Unfortunately the photo looks a lot more luminous than the actual piece. I am freehanding the moon and its reflection.

Monday, April 1, 2013
JE Camellia; Mother of Pearl
Got Camellia mounted in preparation for class. According to Susan Stevens, if the piece takes more than several months to complete, it should be double laced, which I did with #12 perle cotton.

Since I still have 2 weeks to JE class, I decided to try a practice piece. The accomplishment has eluded me, having tried a few times in the past to represent the effects of light, reflection, luminescence, iridescence, etc. Then I was pointed to the Faber Birren Color book, where he discussed how to achieve these effects: "The eye and the brain put into the design a quality which really does not exist externally but in the visual response of the beholder....Iridescence is achieved, not literally with shiny things but visually and psychologically through the magic and curious makeup of the sense of sight." How amazing and I really must try it out.
This is the Mother of Pearl piece I want to embroider.
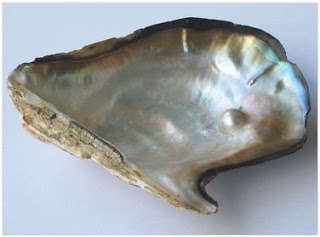 It didn't work out, although there are small areas where there is almost the iridescent effect. I will study it and try a different way. Instead of horizontal stitches, I may make them slope downwards towards the center. I have until JE class starts to experiment.


Since I still have 2 weeks to JE class, I decided to try a practice piece. The accomplishment has eluded me, having tried a few times in the past to represent the effects of light, reflection, luminescence, iridescence, etc. Then I was pointed to the Faber Birren Color book, where he discussed how to achieve these effects: "The eye and the brain put into the design a quality which really does not exist externally but in the visual response of the beholder....Iridescence is achieved, not literally with shiny things but visually and psychologically through the magic and curious makeup of the sense of sight." How amazing and I really must try it out.
This is the Mother of Pearl piece I want to embroider.


Subscribe to:
Posts (Atom)