
Friday, September 14, 2012
Cherry leaves and branch done
This is a good time to stop working and get ready for class next week. Will not blog until at least the week after.

Thursday, September 13, 2012
Cherry branch next
The green underskirt is done. SSH on one side, and don't think I need to SSH the opposite narrower side. At this point I'm kind of stuck. I don't know if the next underskirt layer foundation for the lattice holding has to be weft stitch, or if using diagonal stitch will cause the lattice to sink into the foundation. I can do the cherry branch, leaves and flowers next. As these are in the foreground, I cannot do the kimono top layers without these being finished first. I may pause after the cherry branch until after Mary Alice's class next week.


Wednesday, September 12, 2012
Kimono undergarments
More undergarments done. The green undergarment looks good going from weft stitch to diagonal stitch. Ready to do it on the other side. I want to get the lattice holding stitches on the next underskirt at least started before Mary Alice's class next week. It's a butterscotch color against the dark red of the next undergarment. I can't wait to see how it looks.
At this point I am very glad I chose Gracie as my Phase 6. (Actually Mary Alice kind of twisted my arm when I couldn't make up my mind.) I had a lot of reservations initially, but she grew on me and now I think she is gorgeous. So for those people with Gracie in their stash, I say Go for it! You'd love her!

At this point I am very glad I chose Gracie as my Phase 6. (Actually Mary Alice kind of twisted my arm when I couldn't make up my mind.) I had a lot of reservations initially, but she grew on me and now I think she is gorgeous. So for those people with Gracie in their stash, I say Go for it! You'd love her!

Tuesday, September 11, 2012
Kimono Fading
The SSH for the kimono bottom was done using a mix of blue and lavendar threads. It looked smoother this way and evened out the blue and lavendar stripes of the color merge. The angles of the SSH however turned out to be bad. At least they are somewhat neat and hopefully will not be obvious to non-JE practitioners. This will have to do. Maybe I can put the superimposed gold squares in strategic places to make it less obvious.

From a recommendation by Mary Alice, the dark undergarment is a shade less black than the hair, so as not to compete with the hair.


From a recommendation by Mary Alice, the dark undergarment is a shade less black than the hair, so as not to compete with the hair.

Saturday, September 8, 2012
Finished the kimono section. The fading was done with 2 strands of flat, using 0.25 step adjustments: 1.75Blue + 0.25Lavendar, 1.50Blue + 0.5Lavendar, 1.25Blue + 0.75Lavendar, etc.
Lesson: Should have periodically reviewed the satin stitches from multiple directions and angles while stitching. When the section was finished, I viewed it standing up and from the opposite direction, and I saw all the gaps that I didn't see while working from one direction!

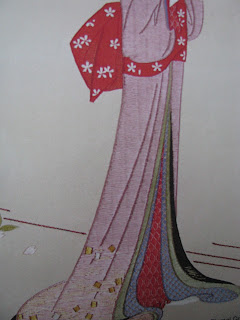


I'm using lavendar for the SSH at the bottom, and blue for the top part of the kimono. I'll see if it may be necessary to use a combination of lavendar and blue in certain parts.
Lesson: Should have periodically reviewed the satin stitches from multiple directions and angles while stitching. When the section was finished, I viewed it standing up and from the opposite direction, and I saw all the gaps that I didn't see while working from one direction!

Repair: I was able to fix it by using one strand to fill in the gaps. Fortunately it turned out ok, and was not noticeable. It will be fine once the short stitches (SSH) are in.
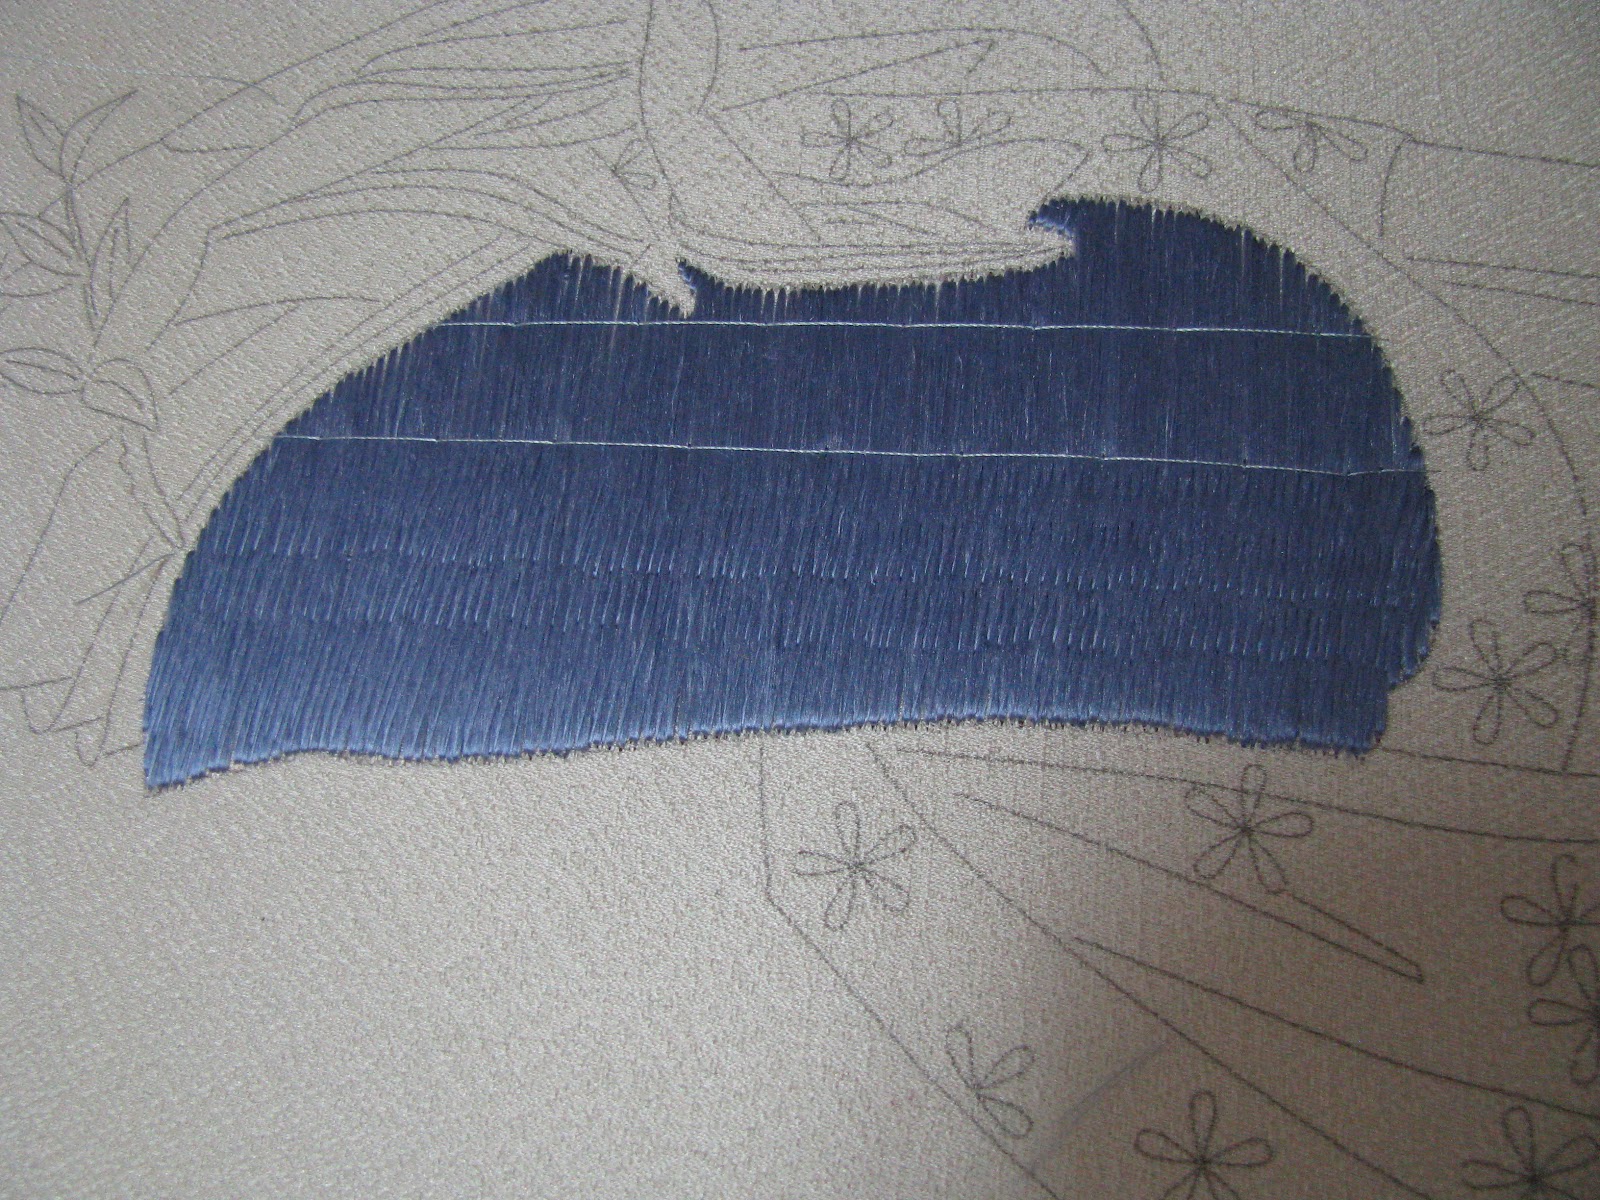
Next onto the temporary holding stitches and the SSH that spans the 8 mm of the temporary holdings. The project picture from JEC, showing the SSH stitches to be perpendicular.

My temporary holding stitches at 8 mm following the curve of the kimono.

Started on the short stitch holdings, using a handy 3 mm ruler, with spacing at 1.5 mm, instead of counting threads.
Lesson: Put the SSH just short of the temporary holding thread, so that the temporary holding thread can be removed easily. Duh! Totally obvious and I didn't think of it the last time.

I'm using lavendar for the SSH at the bottom, and blue for the top part of the kimono. I'll see if it may be necessary to use a combination of lavendar and blue in certain parts.
Thursday, September 6, 2012
Kimono
Did some "simple" satin stitching today. But should have done the right (narrow) side of the kimono before the left, following the top-to-bottom and left-to-right stitching order rules. Oh well, just have to be careful to keep the finished parts covered so as not to rub against it.
I am ready to do the fading of the kimono bottom from blue to lavendar. My initial thought was since it is 2 flat strands for the satin stitch, I would use one strand of blue and one strand of lavendar for the merged section, and then onto 2 strands of lavendar. But I think this will make it look "stripe-y". I really need the sugas (individual silk threads) to mix themselves up. I may need to progress as 1.75 blue + 0.25 lavendar, then 1.5 blue = 0.5 lavendar, then 1.25 blue + .75 lavendar, etc. This may be a bit overkill, I may not need that fine a gradation. I'll have to test it out. Stay tuned. (And any advice would be appreciated).

I have also been mulling over a comment from Kay Stanis. She mentioned that it will be more pleasing to have the Short Stitch holding follow the sweep of the kimono, instead of going perpendicular to the weft lines, as shown in the color picture from the Japanese Embroidery Center. I was at a lower phase then and didn't really understand her. I may have it figured out now. The temporary holding threads (at 0.8 cm intervals) need to follow the curve (instead of vertical), the tacking stitches need to stay horizontal, and the SSH stitches can then follow the temporary holding threads. I will try this out on the side before attempting it.
Tuesday, September 4, 2012
Hair pins
The hair pins really complete the look. According to the instructions, the pins are supposed to be #2 gold couched. From the instruction picture it appears that the pins consist of 2 strands of gold, brick-couched, side by side. The #2 gold will not be able to fill that. So I used 2 strands of #4 gold instead, couched singly.

I will be protecting her face with tissue now. Last chance to look...
Monday, September 3, 2012
Gracie's Hair done
I am beside myself with relief! Here she is before the hair around her face is put in.

Here she is after the face and ear are outlined and the hair framing her face is in.

I have gotten used to the way she looks and I am now quite fond of it - long nose and all. I'm debating about whether I should do the hairpins next or wait till later. Normally I will wait till the end to put the metal threads in, but I think the hairpins will help to hold the hair in place, as the hair is not short-stitch-held.
Saturday, September 1, 2012
Gracie's face done
Put on Madama Butterfly while I worked on the facial features. I practised a whole lot of staggered diagonals on the side before I attempted the eyes and brows. I think it turned out reasonably well; I might re-do the nose - it's a bit long. But again maybe I should leave well enough alone. All in all I'm relieved. I haven't done the outlines of the face and ear. I'll wait till the hair is done first. Good thing there is no short stitch holding in the hair.


Friday, August 31, 2012
Gracie's Face
Got the face and hands done, and put in short stitch holding where the threads spanned 1 cm. I may be getting the hang of the short stitch holding - they turned out reasonably well for the face.
Discussion: Twisted foundation requires 8 mm spacing for the holding stitches. I don't understand why I should put the temporary holding threads at 1 cm and then stitch at 8 mm (as Susan Steven's book says to do), instead of putting the temporary holding threads at 8 mm and then stitch the full 8 mm length. There is the ambiguity of "mid-point" of previous row for the start of the next row of holding stitches, which could mean at 4 mm or 5 mm. I decided to ignore the 1 mm discrepancy and spaced the temporary holding threads at 8 mm.

Transferred the features to the face, including the ear and chin. Decided to leave well enough alone and tackle the features tomorrow.

Wednesday, August 29, 2012
Eternal Grace
Finished one kimono section. Removed the temporary holding threads right away before these could leave creases on the foundation. Things were much better today; maybe my eyes weren't as tired. Actually not counting threads helped A LOT. It turned out reasonably well, all things considered. Another "I'm going to quit JE!" averted; and the thought of doing short stitch holding for the rest of the kimono is not as repugnant.


Tuesday, August 28, 2012
Gracie
Still too scared about doing the face, so decided to finish this section of the kimono first. Instead of using a .5Twist silk for the short stitch holding per the box chart, I thought it would be easier to use .25Flat instead, since 1. I don't have to twist a lot of fine threads, and 2. flat silk stitch is 1 cm long instead of 0.8 cm, which fits into the 1 cm spacing of the temporary holding. I don't know if this is a wise decision or not; half way through the first row I realized that short stitch holding is intended to: 1. turn people blind, and 2. drive them into a mental institution, not necessarily in that order.
On further reading of the Susan Stevens book, she proposed not counting thread, but use spacing and angle instead for the stitch placement. This worked better, although since I started with counting thread, the spacing and angle are not too consistent, but that will have to do. I'll find out how well this foundation holds up when I put the superimposed lines on top. I'll test that out as soon as this foundation is done - to see if I need to un-stitch and start over (or worse!)
Did 3 rows of short stitch holding, and removed the temporary holding thread as soon as the row of holding stitches were done.
Monday, August 27, 2012
Eternal Grace
This piece came on a pretty, patterned fabric. Unfortunately the weft lines are hard to see because of the fabric pattern. Grrrr! So I put in some guide lines in the weft direction.

According to the instructions, I should start with the face, neck and hands. My initial thought was I should wait for Mary Alice's class for the face, and start on the kimono first. I used Mary Alice's recommended colors for the kimono, as I never liked the JEC's suggested pink color (on left). The kimono is going to be blue.

Finished the first section of the kimono, with flat silk satin stitching. Next is the temporary tie down and then short stitch holding.

On further reflection, I will work on the face next. If I messed up on the face and she turned out to be really ugly, I don't want to have had spent a lot of time on the rest of the piece, as this piece will most likely become a permanent UFO. ;-)
Saturday, August 18, 2012
Expanse of Shippo
Since the Shippo piece is not the "normal" JEC Phase 4 piece, I thought I'd give it some discussion.
My JE group found this piece from the JEC catalog. We consulted with Kay Stanis who approved it as a viable substitute. The original one in the catalog is gold and silver on white. Mary Alice Sinton supplied a sage colored silk fabric, and we came up with antique copper and honey gold for the colors. The piece arrived with the design printed on. Unfortunately on stretching it onto the frame there was no way to get the circles to be circular and the lines to be straight, nor was there a way to remove the printed lines. Finally I turned the fabric over and tissue-basted the entire design onto the back side.
[As this is a Phase 4 substitute, the main techniques were metal thread couching - round-and-round, to-and-fro, and vertically held fuzzy effect. These are the same techniques as the JEC Phase 4 - Karahana]
When it was done, I did not like it - the original black design lines were showing through from the back. After everybody got tired of hearing me moaning about it, Mary Alice suggested I put in some "mists" lines as a distraction. She mentioned that it is the standard technique in JE to cover up mistakes. So that is why this piece has the (single #1 honey) gold couched lines, top and bottom, added to the original design. As an aside subsequent orders for this piece do not have the design printed on the fabric.
When the judge saw it at the GPR seminar, she questioned the black design lines, which my JE friends were able to explain away, so that I squeaked by and got a ribbon. Whew!
So here are some pics of the piece in progress, as well as the final result. Before the mists were added...

You can vaguely see the black lines from the back if you click on the image.

Detail

At the GPR seminar

Thursday, August 16, 2012
Framed pieces
All the completed pieces were framed. In addition, I redid the "Expanse of Shippo" to remove the speck of dirt under the glass that the judge pointed out during the GPR Exhibit. I took advantage of it being removed from its frame to photograph it without the glass. This is my JE Phase 4 piece.

Naoshima Sunset framed.

Wedding Shellbox, my Phase 5 piece, framed.

Spring's Splendor, GCC class, framed with linen liner. This one turned out really nice. Darn it! There is a small white speck on the tulip petal, which if the judge saw it would be marked as a demerit! I will have to reframe this later.

Do I have any more excuse about working on Gracie (Phase 6)? Well, it's too hot today!

Naoshima Sunset framed.
Wedding Shellbox, my Phase 5 piece, framed.

Spring's Splendor, GCC class, framed with linen liner. This one turned out really nice. Darn it! There is a small white speck on the tulip petal, which if the judge saw it would be marked as a demerit! I will have to reframe this later.

Do I have any more excuse about working on Gracie (Phase 6)? Well, it's too hot today!
Monday, July 23, 2012
Wedding Shellbox Done
Finally decided to stop obsessing about it, and call it done. There are several places that I would like to redo, but refrained because of the unforgiving Nishijin fabric.
My next project is the Phase 6 Eternal Grace. I also have an extra piece, the "Lightning Bug" that I am contemplating starting as well, but since I don't functional too well with multiple projects (I tend to focus on the easier one) I probably shouldn't.


My next project is the Phase 6 Eternal Grace. I also have an extra piece, the "Lightning Bug" that I am contemplating starting as well, but since I don't functional too well with multiple projects (I tend to focus on the easier one) I probably shouldn't.


Wednesday, July 11, 2012
I'm in JE avoidance mode. But I do want to finish the 2 (GPR Tacoma) seminar pieces while they are fresh in my mind. The "easier" one is Lois Kerchner's Naoshima Sunset. It's about 60% done. I found the criss-cross Hungarian for the shrubs difficult to count, and took a bit to get into the rhythm of the pattern.


Tuesday, July 3, 2012
I was fortunate enough to meet with Kay Stanis during the GPR Tacoma seminar and got some feedback from her about my piece. At the time only the butterfly was not finished. I was very appreciative that Kay pointed out some areas of improvements.
Today I started on the butterfly.

Done done done! The chip edging was fun to do, and looks nice.

Finally! I will do the final cleanup later, and maybe get a better picture taken of the piece.

Today I started on the butterfly.

Done done done! The chip edging was fun to do, and looks nice.

Finally! I will do the final cleanup later, and maybe get a better picture taken of the piece.

Monday, June 18, 2012
Almost done
Finished the lilies of the valley, the edgings and the stems. Before I put in the stems, my son commented that the lilies looked like the ghosties from PacMan.


Finally removed all the tissue paper. On the home stretch now, only thing left to do is the butterfly!

Don't want Pookie to feel left out, so here he is.


I was really worried about the one lily that sits on top of the heavy tulip stem, and was considering putting it behind the stem instead. But then I figured that Kay might fail me for doing that ;-) It turned out reasonably well, even the edging.
After doing lots of cuts of the pearl purl for the edgings, it finally occurred to me (duh!) how to fix the magnolia bud. I need to cut the purl to make it lay flat. Here's the redid bud.

Finally removed all the tissue paper. On the home stretch now, only thing left to do is the butterfly!

Don't want Pookie to feel left out, so here he is.

Friday, June 15, 2012


Thursday, June 14, 2012
Tulip stems
I'm glad to be done with the Grecian twists. The second time was somewhat easier - 20 minutes to sink and whip instead of 40 minutes yesterday! The small stem for the bud was actually the hardest since it is so short. It's fortunate that I did this one last.


Wednesday, June 13, 2012
Finished the magnolia stem with couched #5 passing gold, and the stem bud with pearl purl (or purl purl). It was initially fun working with this new thread, as it involves stretching it carefully to twice its length. But it doesn't turn the corner very well and I tried to help by stretching it a little more around the corners. It looks bad, I will have to redo it, but then there is no guarantee I'll do better the second time...

The tulip stem is a Grecian twist. It took some serious convincing to sink the ends to the back! A sinking needle did not work. I taped the end to make a point, made a large hole with the tekobari, pushed on the top and yanked with tweezers on the bottom. Whip stitching the ends on the back was difficult also, I finally taped the 2 ends to the back of the fabric before I was able to whip stitch them.


The tulip stem is a Grecian twist. It took some serious convincing to sink the ends to the back! A sinking needle did not work. I taped the end to make a point, made a large hole with the tekobari, pushed on the top and yanked with tweezers on the bottom. Whip stitching the ends on the back was difficult also, I finally taped the 2 ends to the back of the fabric before I was able to whip stitch them.

I am all tired out after fighting with the Grecian twist; quitting early.

Tuesday, June 12, 2012
Finished the crab apple flowers, including blossoms, chip centers, leaves, branches, calyx, and removed the basting threads that were showing. Was a little apprehensive about chipping the check purls, and so I did a practice chip center on the side. I think it turned out ok. I had to look up the instructions for "radiating satin stitch", used for the bud calyxes. I thought it meant radiating out from one point, but that's not so.
 Worked the magnolia stems and calyx.


What it looks like now. Will be working on the magnolia leaf next.

Monday, June 11, 2012
Finished the crabapple blossoms and the buds. I was trying hard to make nice round buds, as I was inspired by the perfect bud that a JE friend (Pamela H) made for her Wedding Shellbox. Alas no, they won't turn out perfectly round. I will need to practise, practise, practise!


Yoshi saying "You're at it again!?"

I don't take as many pictures of Coco as Yoshi, so here he is.
Finished the crabapple leaves today. When I started to bend one leaf, it got totally outside the outline, but since the bend was ok I let it go. I also redid this leaf 3 times.

Got stopped at this point with a question to the class leader regarding the braid couching.
Subscribe to:
Posts (Atom)